A friend returned from vacation with nails that caught the light like fish scales—shifting from teal to purple to gold depending on how she moved her hand. I couldn’t stop staring. They looked like she’d dipped her fingertips in an oyster and found something magical inside.
“That’s not paint,” she laughed. “That’s mermaid magic.”
She wasn’t wrong. Mermaid-effect nails capture something special: the iridescent, shifting beauty of the sea. And once you learn the technique, you can create that magic at home.
Here’s everything I’ve learned about achieving this enchanting look.
What Are Mermaid-Effect Nails?
Let’s start with the defining features.
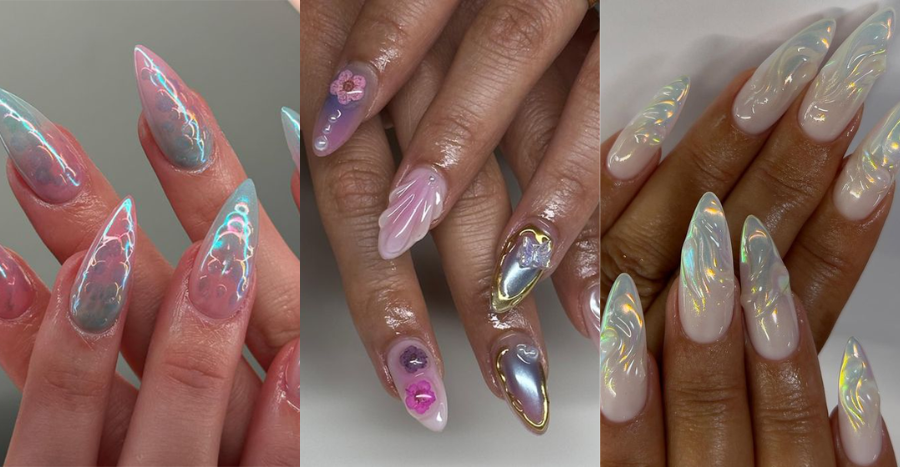
Mermaid-effect nails are characterized by shimmering, iridescent colors that shift and change depending on the light and angle . Think of abalone shells, fish scales catching sunlight, or the inside of an oyster—that pearly, rainbow quality.
The look typically combines:
Iridescent shimmer. Colors that flash between blues, purples, pinks, greens, and golds. The effect comes from light refracting off microscopic particles.
Scale-like texture. Many designs incorporate actual texture—either through stamping, foil application, or embedded materials—that mimics the layered look of fish scales.
Ocean-inspired color palettes. Deep teals, aquamarines, soft lavenders, seafoam greens, and pearly whites dominate. But mermaid nails can adapt any color with the right iridescent finish.
Depth and dimension. Unlike flat color, mermaid nails have layers. You see through the top shimmer to the color beneath, creating visual complexity.
Some designs go all-in with 3D elements like shells or pearls . Others keep it subtle—just a wash of iridescence over a soft base. Both approaches capture that undersea magic.
Why Choose Mermaid-Effect Nails?
After experimenting with this style for months, here’s why it’s worth trying:
They’re conversation starters. People notice mermaid nails. They’ll ask where you got them, how they work, whether you’re a mermaid in hiding. It’s fun.
They shift with your outfit. Because the colors change in different light, mermaid nails adapt to what you’re wearing. That blue dress makes the blue tones pop; that pink top brings out the rose.
They hide imperfections. The busy, layered look disguises minor application mistakes. A slightly uneven coat? Lost in the shimmer.
They work for any season. Summer says beach vibes, winter says icy mermaid queen. The look adapts.
They photograph beautifully. Camera flash catches the iridescence. Your nails will steal the show in every picture.

Essential Tools and Products
Before diving in, gather these supplies:
Base coat: Prevents staining and helps adhesion.
Color base polish: Your foundation color—teal, lavender, seafoam, or whatever ocean shade speaks to you.
Iridescent topper or pigment: This creates the mermaid effect. Options include:
- Iridescent flakies: Tiny shimmering particles in a clear base
- Mermaid powder (chrome powder): Rubbed onto tacky color for intense shine
- Holographic glitter: For sparkle with dimension
- Iridescent cellophane or foil: Torn into pieces and applied for scale effect
Sponge (optional): For gradient effects.
Thin brush or dotting tool: For scale details.
Top coat: Seals everything. Glossy works best for maximum shine.
Nail file and buffer: For prep.
Cuticle oil: For finishing.
How to Achieve Mermaid-Effect Nails: Step by Step
Method 1: The Iridescent Flakie Approach (Easiest for Beginners)
Step 1: Prep and Base
Shape nails, push cuticles, buff lightly, cleanse with alcohol. Apply base coat and cure or dry.
Step 2: Apply Color Base
Apply 1-2 coats of your chosen ocean color—teal, lavender, soft pink, whatever speaks to you. Let dry completely.
Step 3: Apply Iridescent Flakies
Using a dry brush or your finger, gently dab iridescent flakie polish onto the nail. Start at the cuticle and work toward the tip, but don’t overthink placement—randomness looks natural. For heavier coverage, apply a second layer.
Pro tip: For a gradient effect, concentrate flakies at the tip and fade toward the cuticle.
Step 4: Seal with Top Coat
Apply a generous layer of glossy top coat. This smooths the flakies and creates that wet, underwater shine. Cap the free edge.
Step 5: Hydrate
Apply cuticle oil and admire your shimmer.
Method 2: The Mermaid Powder Technique (More Advanced, Intense Shine)
Step 1: Prep and Base
Same prep as above. Apply base coat.
Step 2: Apply Color Base
Apply your chosen color. Do not cure or dry fully—you need a tacky surface.
Step 3: Apply Mermaid Powder
Using a sponge applicator or your fingertip, gently rub iridescent chrome powder onto the tacky nail. The powder will stick, creating intense metallic shine. Buff until smooth.
Step 4: Seal with Top Coat
Apply top coat carefully to avoid smearing the powder. Cure or dry.
Step 5: Optional Scale Detail
For added texture, use a thin brush and white or silver polish to paint tiny “C” shapes in overlapping rows, like fish scales.
Method 3: The Cellophane or Foil Technique (For Scale Texture)
Step 1: Prep and Base
As above.
Step 2: Apply Color Base
Apply your base color and let dry.
Step 3: Apply Adhesive
Paint a thin layer of clear polish or nail glue where you want foil to stick.
Step 4: Apply Foil or Cellophane
Press torn pieces of iridescent cellophane or nail foil onto the adhesive. The torn edges create scale-like shapes. Press gently, then peel away the backing.
Step 5: Seal
Apply top coat generously to smooth the surface.
Tips for Making Mermaid Nails Last
After perfecting your mermaid manicure, you want it to stay beautiful:
Seal those edges. Cap the free edge with every layer—base, color, flakies, top coat. This prevents water from getting underneath.
Thin top coat layers. Two thin top coats last longer than one thick one. Apply, dry, apply again.
Wait before water. Give your manicure a full hour to harden before showering or washing dishes.
Wear gloves for chores. Water is the enemy of nail art. Protect your investment.
Oil daily. Cuticle oil keeps the surrounding skin healthy and prevents lifting at the edges. Apply morning and night.
Reapply top coat every few days. A fresh layer of glossy top coat refreshes shine and seals edges before they lift.
Avoid using nails as tools. No opening cans, peeling stickers, or scraping. Your mermaid magic deserves respect.
Common Beginner Mistakes
Skipping base coat. The shimmer shows every stain underneath. Protect your nails.
Applying flakies too thickly. Layers should build gradually. Thick flakie layers look lumpy under top coat.
Not capping edges. Chipping starts at tips. Always seal.
Using matte top coat. Mermaid nails need gloss. Matte kills the shine that makes the effect work.
Overworking the design. Sometimes less is more. Let the iridescence do its thing.
The Bottom Line
Mermaid-effect nails capture something magical: the shifting, shimmering beauty of the sea on your fingertips. Whether you choose subtle iridescence over soft pink or full-on scale texture in ocean blues, the result is enchanting.
With the right tools and a little patience, you can create this look at home for a fraction of salon prices. And every time light catches your nails, you’ll remember: magic exists, and sometimes it lives right at your fingertips.
Read also: The Baby Boomer Manicure: A Modern Twist on a Classic